Often, when we need to apply a design we find different Fonts to which we think fits best with the design, for that reason use a custom Font. That’s what we’re going to be learning in this post!!
Let’s start!
For the example I will use the Cute Jelyfish font, you can find it here. The first that we have to learn is that we need to do some little platforms setting. Let’s see!

IOS settings
1⃣. Add your font in the Resources folder. So that your project is more organized, you can add the Fonts folder inside the resources. Once added, make sure that the Build Action property is configured as BundleResources.
2⃣. In your Info.plist, add the Fonts provided by application or UIAppFonts key.

How to use?
To use you just have to add FontFamiliy property next to the font name without extension.

Android settings
You just must add your font into the Assets folder.
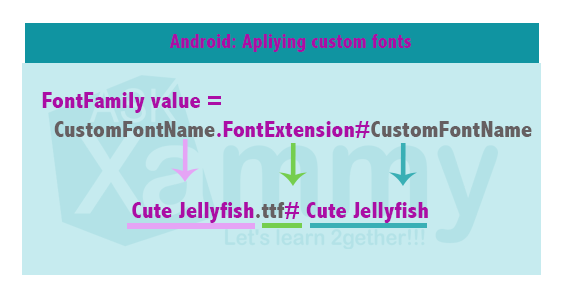
How to use?
Android has a different way to use it, you just have to follow this structure:

Code Example:
But… If IOS and Android have different ways of use .. how could I apply it to my App? ?
We just have to mix each platform setting. To do it, let’s use OnPlatform, which allow us to add configuration for a specific platform from our XAML.
Spanish post: https://medium.com/@reyes.leomaris/agregando-fuentes-personalizadas-en-xamarin-forms-bb0023b69006?postPublishedType=initial
Thanks for reading!!!


Very helpfull !!
?
good one!! very clear and nice explanation
Thank you dear ?!