

Howdy! 🙋♀️ Thanks for being here, hoping that you’re doing well! This time I just want to show you a very interesting and useful topic for our Xamarin Forms Applications: Data caching
Imagine the following scenario: You have to confirm your latest transactions in your bank account! You will say something like a “Perfect !! I have a mobile banking application available”😎.… You have to give that information quickly because you have a great purchase opportunity that depends on it … But suddenly you lost your internet connection… and guess who couldn’t confirm the information and lost the purchase?…🤦♀️
As developers, to help in making our users experience more pleasant, it’s important to keep in mind these types of scenarios, and this is where Monkey Cache enters in, adding data persistence to our app so our users can access their information even without having an Internet connection available.
What is Monkey Cache?
Monkey Cache is a library written by James Montemagno that enables developers to easily cache any data for a limited amount of time. All data for Monkey Cache is stored and retrieved in a Barrel. You can check the full resource here.
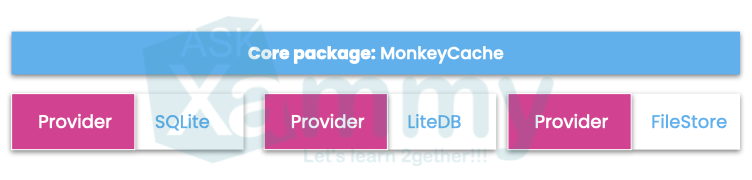
MonkeyCache has three providers, which you can choose according to the need of your project (SQLite or LiteBD) or if you don’t have any of the above you can use the FileStore which is a local file-based backing.
Finally, I’ll show you what’s available in Monkey Cache. (We will be using some for the implementation of our example)

Let’s start!
For the example that we will be developing, we will use FileStore.
 Add from NuGet Package the plugin: MonkeyCache.FileStore

⚠ Important to know: In this case, I already have my example previously prepared in which I consume a web service with Refit. If you need more information about how to do it, you can see enter here.
Step 1: Setting Up your App
To start is required to set an ApplicationId for our App, once set a folder is created specifically for your app on disk. (In this case, I will add on my Constructor ViewModel.)
Step 2: Getting the Data from our Web Service and saving the data in cache
To show data in the cache, it’s first necessary to have it 🤷♀️, for this reason, in this step we will first consume the API and then save this data in the cache to later show it when our App is Offline.
Create an Async method as you can see in the below:
Inside it, let’s establish the connection to the API that we’ll be using.
⭐ Then, in the code block shown above, I added a comment like the following: “Add here the code that is begin explained in the next section “. So, just right there let’s add the code line that will allow us to save the data that will be available for when we don’t have internet on our device.
Summarizing of what we did here. The Add method receives three parameters:
➖ Key: It’s the URL from our web service.
➖ Data: It’s the set of information that our web service returns and to which in this case it feeds the ObservableCollection.
➖ ExpireIn: It’s the time you want your cache data to last.
And done! In this step, we already have our data saved in Cache! Now let’s see how to show it once our user has no internet connection! 🤓
Step 3: Once offline, how can I show the data? 🧐
In the second block code added in step 2, you can see a comment like the following: “Add here the code that is begin explained in the next step”. In this space is where we will work step number 3.
The first that we have done is to confirm two important things:
➖ Confirm if the device has or not a connection available: To do it, I will use Xamarin Essentials, you can read more information about connectivity here.
Connectivity.NetworkAccess != NetworkAccess.Internet
➖ Confirm if our data expiration: Once this previous step is done, it’s important that we confirm if our data is not yet expired.
Barrel.Current.IsExpired(key: BaseURL)
Here we implement both of them:
Now, let’s get our cached data
Inside the previous code block, let’s add this.
⚠ As you can see, I used Barrel.Current.Get< to pass on my ObservableCollection. It will allow us to retrieve our cached data.
Finally, just to keep informed our users, I used a PopUp to show the connection state. You can read more information about PopUp here. 🕵♂ ere you can use whatever you feel most comfortable with, such as an ACR user Dialogs or just play with the UI color with the “Connection is down” message or whatever you like! 🤷♀️ (But always keep in mind the UX)
Step 4: Working with the XAML
Voilà!!!! 🎊 Our data is already cached! 🤓
📄 Do you want to practice what you have learned? Let’s take a little test! 😎

References: https://github.com/jamesmontemagno/monkey-cache


Always learning!
Thank you for sharing, Leomaris!
It’s a pleasure for me! 😊
Hi,
Thank you for your post about MonkeyCache,
Quick question – if you would have to choose – Akavache or MonkeyCache?
Thank you.
Hi!! Both are very useful!