While .NET MAUI layouts are extremely useful for developing graphical interfaces, it’s always nice to have additional options for arranging elements on the screen. In this article, you will learn about the DockLayout, a layout provided by the .NET MAUI Community Toolkit!
To facilitate the understanding of this explanation, I will divide it into the following subtopics:
🔹 .NET MAUI Community Toolkit installation
🔹 What is a DockLayout?
🔹 Explaining the DockLayout structure
🔹 Discovering the Properties of DockLayout
🔧 First of all… What do I need to know?
What is .NET MAUI Community Toolkit??
- It’s a collection of reusable elements such as animations, behaviors converters, among others, for developing applications for iOS, Android, macOS and WinUI using MAUI.
🔧 Still haven't implemented it? Check it here!
- Add from NuGet Package: Community.Toolkit.Maui

- Now let’s initialize: Go to your MauiProgram.cs file
In the CreateMauiApp method, place in the .UseMauiApp<App>() line and just below it add the following line of code:
⚠ Don’t forget to add the using CommunityToolkit.Maui;at the top of the class.
- Finally, add the following namespace:
Let’s start!
What is a DockLayout?
The DockLayout is a layout that enables views to be docked to the top, left, right, or bottom of the layout and it is provided by the .NET MAUI Community Toolkit.
Explaining the DockLayout structure
This layout is essentially composed of different pre-defined positions that enable you to dock secondary views, providing an organized arrangement of your elements. Among the default we have the following:

How does it works? 🤔
Understanding the conceptual structure of a DockLayout can be made easier with the help of a visual explanation. First, let’s examine the image, and then we’ll walk through the step-by-step explanation:
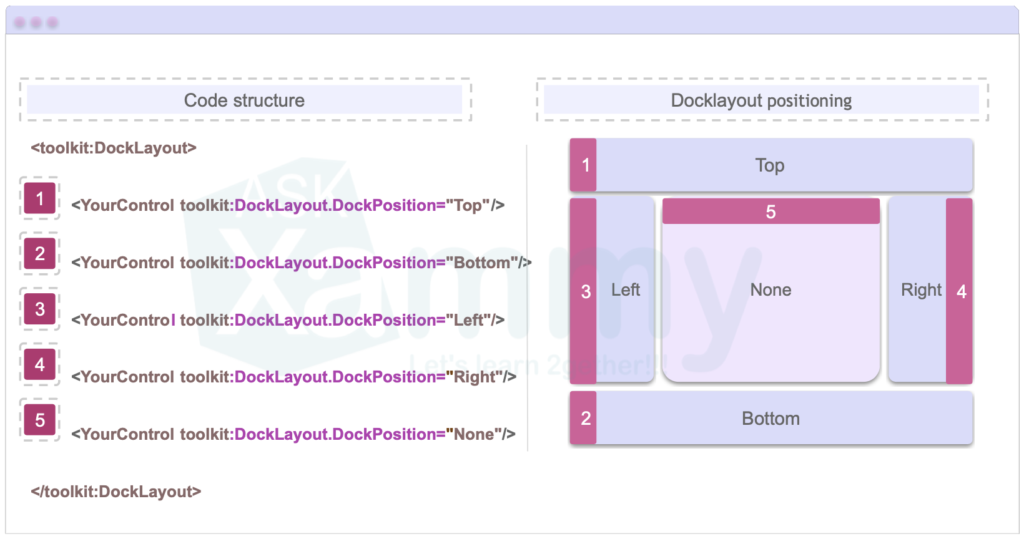
Let’s understand the image: To add the DockLayout, you have to keep in mind the following elements:
➖ Step 1: You have to open the <toolkit:DockLayout> </toolkit:DockLayout> tags, where “toolkit” is the namespace definition.
➖ Step 2: Within these tags, add all the elements you need. For instance, a Button. You have to specify the position of this button within the DockLayout by using the DockPosition property, which can take the values of Up, Bottom, Left, Right or None.
▪ For Left / Right, you need to specify a WidthRequest.
▪ For Top /Bottom docking, the child view’s size along the docking direction is defined by a HeightRequest.
You can do it as shown below:
Discovering the Properties of DockLayout
DockLayout has its own set of properties, let’s know each one of them:
➖HorizontalSpacing / VerticalSpacing: Allows you to adjust the horizontal or vertical spacing respectively between docked views. – [Gets/sets a double as value]
The DockLayout impacts the adjacent views with these properties. For example, HorizontalSpacing is applied to Left, None, and Right views, as well as neighboring views in the same DockPosition. Similarly, VerticalSpacing is displayed between views stacked vertically at the Top, None, and Bottom positions.
➖ ShouldExpandLastChild: Setting this value to true enables the final child to fill any leftover space and expand as needed. – [Gets/sets a bool as value]
➖Padding: Inherited from Layout, this property provides access to the padding around the layout container.
✍️ Important to highlight
➖ To display all child views properly, the container must always be sized to cover each view’s minimum size, especially when using HeightRequest or WidthRequest. If there is not enough space for all child views to render, the DockLayout container will prioritize child views in the order they were added. The last-added children will be removed first during rendering, as they have the lowest priority.
And done! 😎 From now on, you are ready to use DockLayout in your .NET MAUI applications. I hope you liked it! 💚💕
<Label Text=”Thanks for ready! 👋 ” />
Spanish post:
References: