When we are developing an application we usually face requirements that needs some visual changes depending of a specific control’s state. For example, we may need to increase the height of an Entry while the user is writing, but we may also need to modify the text color, the most important is that all of this must happen when the Entry has been Focused. ?
That’s why in this post we will be learning about Visual State Manager. We are going to learn the topic in the following points:
? Learning main concepts
? Understanding the VSM structure
? Creating an example step by step
? Creating our own VSM
Learning main concepts ?
 What exactly is the Visual State Manager?
Visual State Manager (VSM) was introduced in Xamarin Forms 3.0. It allow us the make visual changes to our controls depending on the state.
 VSM and Triggers: Differences
Triggers can also make visual changes in our UI controls based on property changes or in events. However, if you want to make various changes combinations based on states is better use Visual State Manager because is less confusing due to its structure.
Let’s start!!! 
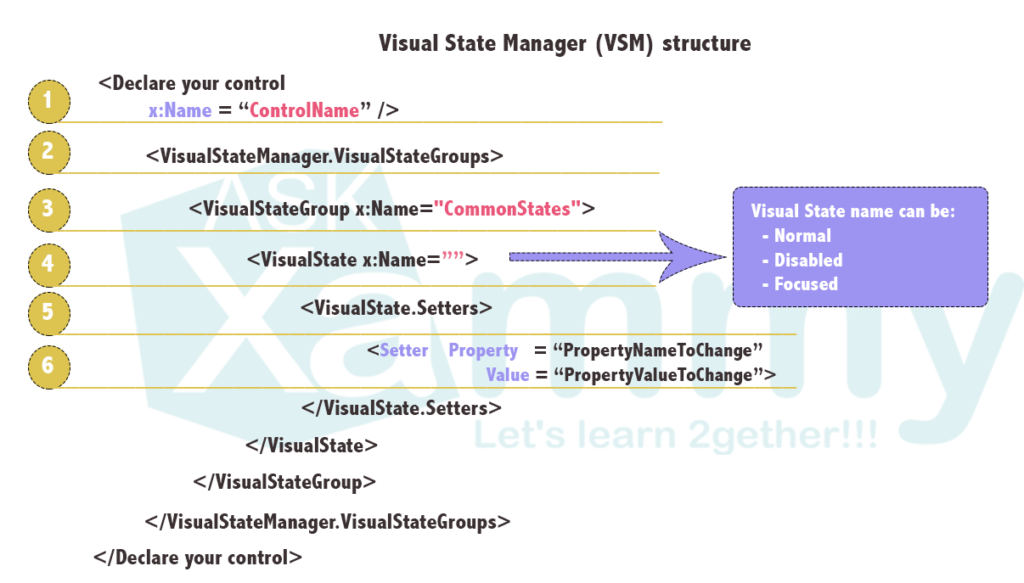
Understanding the VSM structure
To understand better the structure required for Visual State Manager, we will be applying through exercises that we will create step by step.

Let’s coding!
1⃣. Let’s declare a control in which will attached the VSM markup.
2⃣. Creating in a waterfall mode, inside the previous tags let’s add the following tags:
3⃣. Add VisualStateGroup tags. You can use x:Name or Name to refers to the CommonStates group. It’s important to know that Visual State Manager defines one visual group named “CommonStates” that contains three visual states: Normal, Disabled and F
⚠ This visual state group is supported for all classes that derive from VisualElement, which is the base class for View and Page.
4⃣. And now, let’s add the Visual State desired! As we learned above, we have three visual states the CommonStates visual group. For this step, let’s add a Focused state!
5⃣. Add <VisualState.Setters> tags inside and finally let’s set the properties that the control will get when it gets the desired state.
Here the complete example:

Creating our own VSM
But.. What happens if we want to create a state that does not exist in the CommonStates visual group? ? Easy.. Just create your own VSM!
As we saw in the image structure explained above, you will follow the same steps. You just don’t have to add the name (x:Name) on the <VisualStateGroup> tag in the step number three.
Them, just define the Visual States that you want to apply to your control. In this case, I going to create two states named “Correct” and “Incorrect” to validate an Email in the Entry control.
⚠ Important: To change the state we need to add the following line:
VisualStateManager.GoToState (
Control name that you want to apply the new state,
New state name );

To apply this states, let’s create an event to add the new states to our Entry!
And done! Our custom Visual State Manager is ready! ?
Spanish post: https://medium.com/@reyes.leomaris/aprendiendo-sobre-visual-state-manager-vsm-en-xamarin-forms-999819c68bbc
Thanks for reading!!!
References:
https://docs.microsoft.com/en-us/xamarin/xamarin-forms/user-interface/visual-state-manager


2 thoughts on “Getting started with Visual State Manager (VSM) in Xamarin Forms”