Howdy!!! ?♀I’ll continue doing what I love ? In this case we are going to replicate a Flight UI obtained from Dribble, designed by Gleb Kuznetsov✈. You can check it here! But this time we will carry out a slightly different dynamic than the previous articles by explaining the structure first!
If you are starting with Xamarin Forms, this is a very good exercise to understand MVVM better! ?
As we know every design has a support structure behind it and it’s necessary to understand it as well as possible. It’s for this reason that we will start this article developing the implementation of MVVM. We will be doing the analysis of the required classes and therefore their attributes, to obtain the necessary Models and ViewModels, to subsequently be able to communicate with the UI that we will develop! ??
So in detail we will be seeing the following points:
➖ Identifying and creating the required Models
➖ Creating ViewModel and filling out the data
➖ Preparing Views implementation
Let’s start!
.
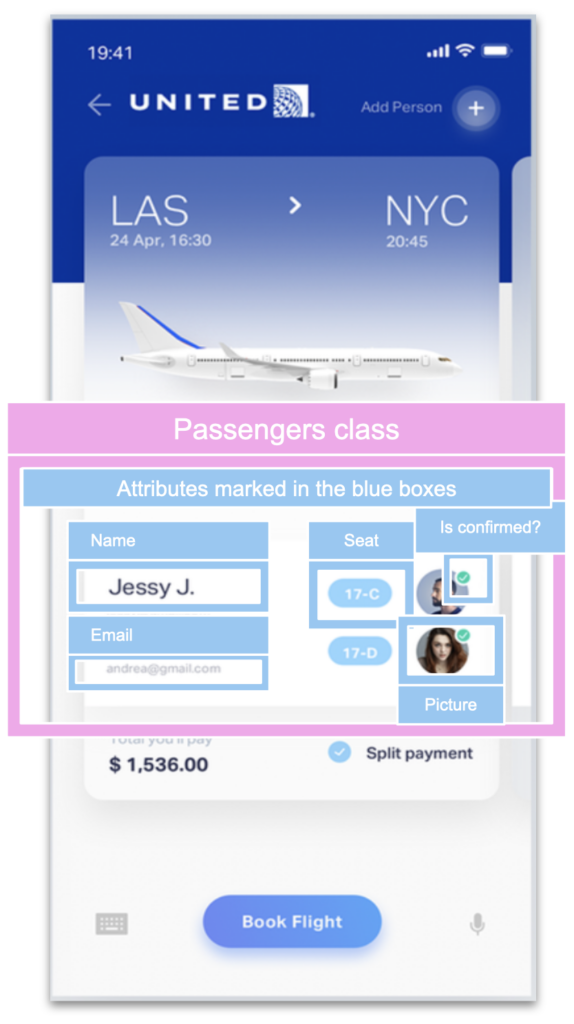
Identifying & creating the Models: Passenger class

To start let’s see the design we have as objective! The purpose of the application is to display all the flights details and the passengers that are registered.
Knowing this, we will start by identifying each one of the passenger data.
As we see in the image, we will need the following attributes:

In your project create a new folder named “Models” and inside then, we’ll be adding all created Models.
And now, let’s create the Passenger class!
Once created the first class, let’s create the Flight class!

Let’s continue identifying the Flight attributes required.
As we see in the image, we will need the following attributes:

.
And now, let’s create the Flight class!
Finally, we have created all our required models! We are ready to continue with the ViewModel creation! ??
Creating our ViewModel
Before creating the class, in your project create a new folder named “ViewModels” and inside then, add the following class:
Let’s start creating the FlightViewModel: Beside this, I also declare an ObservableCollection for my flight list.
Once created, let’s use our data structure filling out with testing information!
Preparing Views implementation!
Finally, let’s prepare the communication between these before views to start with the development of our UI! In your project create a new folder named “Views” and inside them, add all the views that you need, in this case let’s add FlightPage.
Once created: Since we are implementing MVVM in a simple way, add a BindingContext to your XAML! As we are using simple way to do it! In your XAML before <ContentPage.Content>
Or if your want to add it in c# code, just go to your PageName.xaml.cs
Congratulations! Your data is structured and ready to start working with the UI! ?
? In the second part of this series we will be creating the XAML structure to replicate the design!
? Additional information:
- The second part of this post “Replicating Flight UI: Working with the XAML” will be available here.
- If you want to know more information about MVVM, you can read the following article.

Good luck with your implementation!
Thank for reading!!! ?


404 for the repo URL
https://github.com/LeomarisReyes/FlightUISample
Thanks! The repository was fixed! 🤓