
When developing an application, it’s very likely that much of its development will require interaction with a web service. We can use different tools to connect and retrieve data from web services but in this case we will learn how to do it using Refit and we will split it in the following topics:
➖ Things that you need to know
➖ What is Refit
➖ Doing Refit Implementation
▪ Creating the Model
▪ Creating the interface (Understanding its structure and sending (or not) parameters. )
▪ Creating the request (Understanding its structure and receiving parameters (or not) through it.)
First of all… What things do I need to know? ?
To start with this article, we need to know the meaning of some important terms that we will be using throughout the article:
➖What is a RestFull Web Service
Is a lightweight, maintainable, and scalable service that is built on the REST architecture. RESTful Web Service, expose API from your application in a secure, uniform, stateless manner to the calling client. The calling client can perform predefined operations using the Restful service. The underlying protocol for REST is HTTP. REST stands for Representational State Transfer. You can read more information here.
➖What is an EndPoint
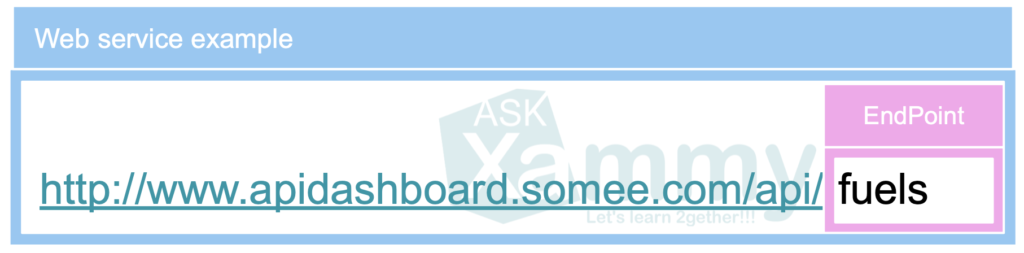 Is an URL which offer to us a location which the client can get access to the different resources provided by the service.
.
Let’s start!
What is Refit?
Refit is an open source library created by Anais Betts. Which allows us to consume REST web services, It turns a REST API into a live interface and most importantly, allows us to keep our code, clean and readable, therefore makes its maintenance easier. You can check the full resource here.
Refit implementation
To start the explanation we will be using a Web Service in which we can interact with Fuels history provided by Steven Checo.
⚠ In this article we will develop different code samples, some of them are just there to correctly understand the explanation, as exercises we will be developing the implementation of the web service but only using some of the code samples, so you know what they are and you can complete the final example with these code blocks. You can identify them when you see them marked with the star. ⭐
Add Refit NuGet Package

We will be working with the following service: http://www.apidashboard.somee.com/api/fuels
Step 1: Creating a Model
To create our model class we can do it in two ways:
?Identify the attributes manually and create the class
?You can do it automatically ( This is faster, I recommend it! ?)
➖ 1. In you Visual Studio go to Edit -> Paste Especial -> Paste JSON As Classes.

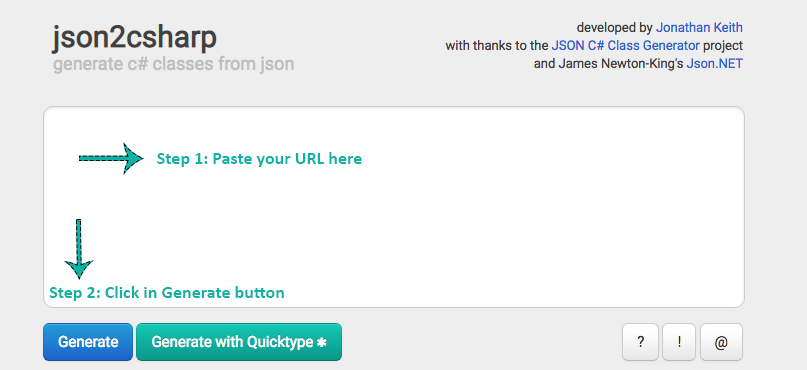
➖ 2. If for lack of any update and you cannot see the previous option you have other to do it! You Just have to access to the following link http://json2csharp.com/ then add the URL of your web service and click on the Generate button.
⚠ I added this tool, but you can use any other with which you feel comfortable to create entities automatically.
⭐ Then, add the generated class to your project:
Step 2: Creating the interface structure
An interface contains definitions for a group of related functionalities that a non-abstract class or a struct must implement. You can read more information here.
To make possible the interaction with the Web Service, we need build an Interface which need a structure like this:
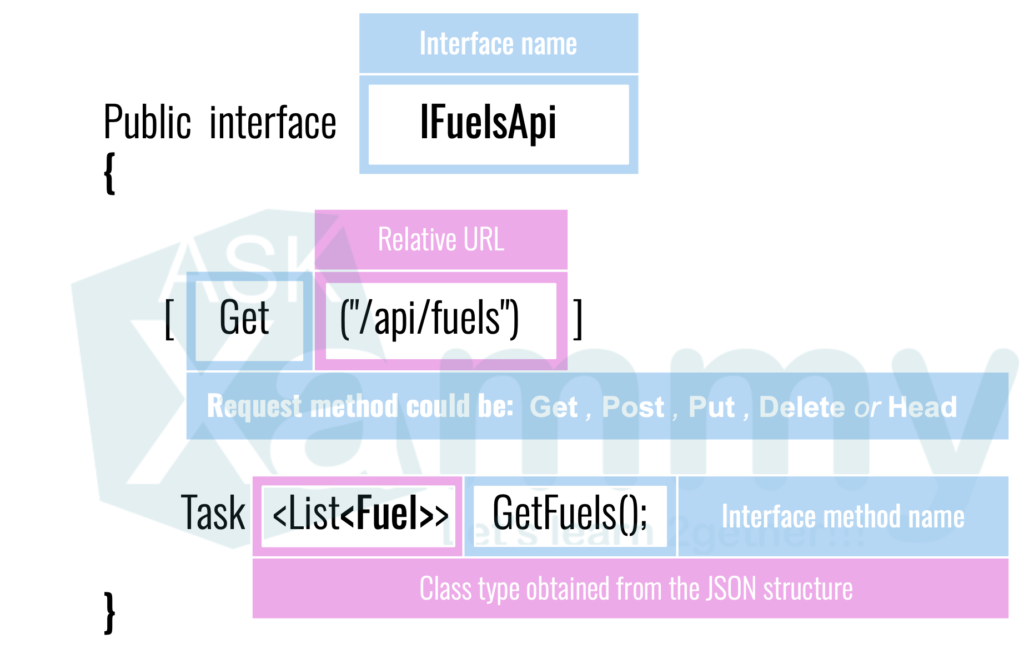
⭐ Code implementation (Without needing parameters):
In this step is where we make the service call, in the Request method of the interface where we must establish the parameters that our EndPoint needs in case of requesting them, otherwise we just leave the Relative URL. (As we saw in the code example above)
➖ Now let’s see how to pass parameters:
We have two ways to do it: Query string or with the Body. Both use the same structure shown above, only that it will receive parameters in its structure.
✔. Query string:
?Step 1 –In the Request method (In this case GET) add the parameter that you need: For example: Description={
?Step 2 -Inside the Interface method add as many parameters you have added in the line above. For example: string description
? Important tip! The name of the parameter may not have a description closely related to what it does, for this you can use aliases!
You just have to add: [AliasAs(“The name that you want”)] following to the type and name of the parameter.
✔. Or with the Body:
We can send the request as JSON content or as a Form Post.
? JSON Content: We need to add the [Body] attribute next to the class model. (For example: [Body] Fuels fuels ) Which will serialize or deserialize the JSON to this class internally.
?Form post: Follow to the [Body] add the BodySerializationMethod.UrlEncoded.
⚠ Currently the EndPoint does not receive these parameters, they are only made for the explanation of the topic.
Step 3: Doing the request
Before create it, It’s very important to understand the structure which will allows us to call to the action.
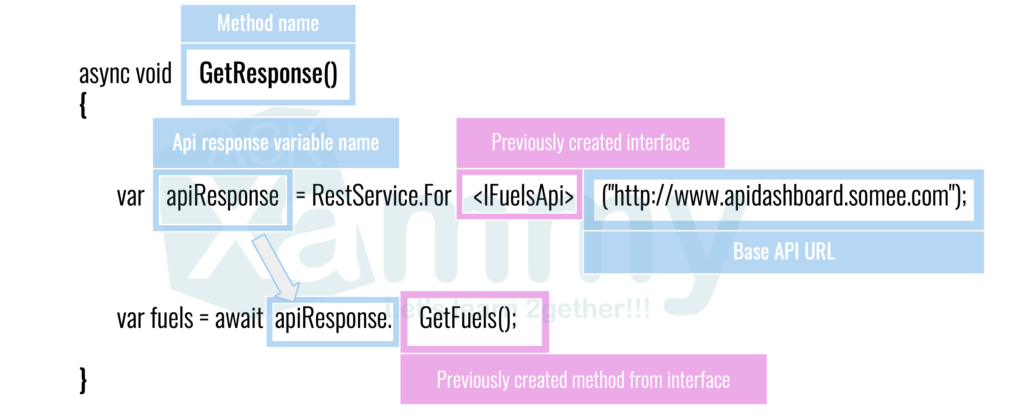
⭐ And now we are ready! This is code implementation:
This is where we make the final communication with the EndPoint and we must take into account whether the interface requires parameters or not, if it does not, you can implement the code example above. But if you need parameters you must build the call method as follows:
✔ If you send the parameters by Query string: Inside the previously method created from the interface (GetFuels) just add the parameter needed in this case the Description.
✔ Or by Post Form: Inside GetFuels method add the class model that you need to pass.
And done! You have your web service data in your project!
Remember that since the web service that we are using this post does not contain the EndPoints that accept parameters, we use some examples above in order that you can understand it as much as possible, for this reason, we develop the example shown only with the code portions marked with the star in order to obtain a real result. ⭐

¡By the way!
If you want to learn how to build your first Api Rest, I recommend this article from Leslie Ramirez. (Spanish post)
Serie: Desarrolla tu primer API REST en Asp.Net Core (Prepara tu entorno)
Good luck with your implementation! 
Thank for reading!!! ?
References:
https://xamgirl.com/consuming-a-restful-web-service-in-xamarin-forms-using-refit-part-1/
https://somostechies.com/consumiendo-servicios-rest-con-refit/


Hi, great post, but http://json2csharp.com/ is down!
Hi! It’s up again!
Muito bom
💕