
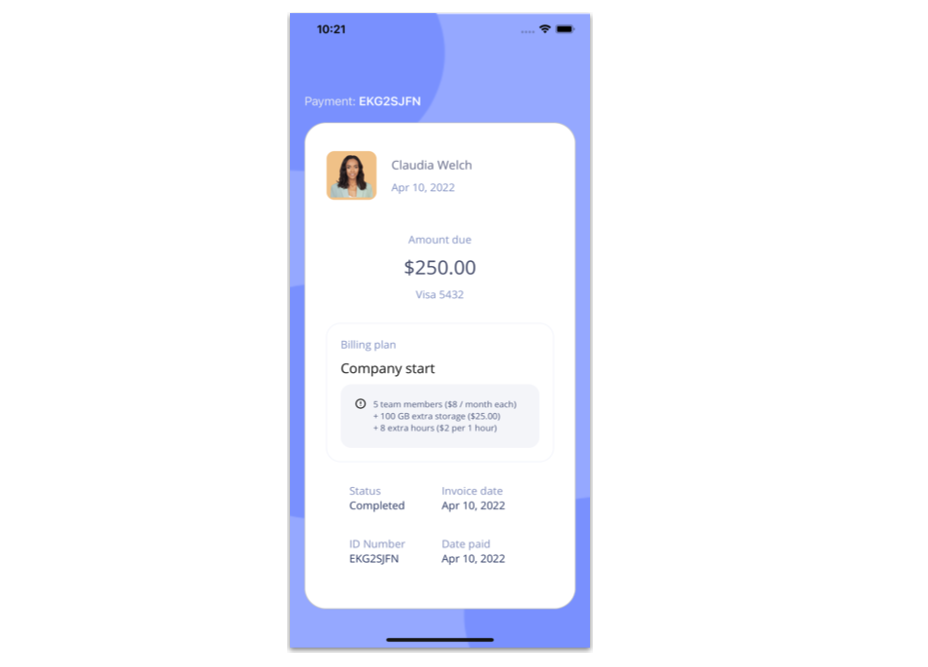
 Remember that practice is the key to success in everything you do, in this case in your XAML skills. This time we will be replicating the Billing Dashboard UI in .NET MAUI! This design was created by Liev Liakh obtained from Dribbble. And today we will convert it to XAML code! I hope this is useful for you! 💚
 Before starting, to get the best out of the post, I’ll leave you some instructional notes so that you have a better experience reproducing the UI:
 At the beginning, you will see an image with the original UI where you will see divided into blocks as we’ll be working on each part of the design. Each block presents the image with the design explicitly that we’ll be working on that block, they are highlighted in a box. In each of the code blocks, you can see a comment that says: “Here add the code that is being explained in the next block“. To keep you as focused as possible, this part indicates to you that the next block code explanation goes right where the comment line is added. I will not be using styles so that the properties added to the various components can be seen and understood faster in the explanation process.
Let’s start!
Let’s divide the original design into blocks
To better understand, I have divided the original design into blocks, which are listed in the order in which we will be reproducing each one, these are:

First, let’s define the main layout we’ll be using!
In this case, we will use a Grid to structure the screen as you can see in the following code block:

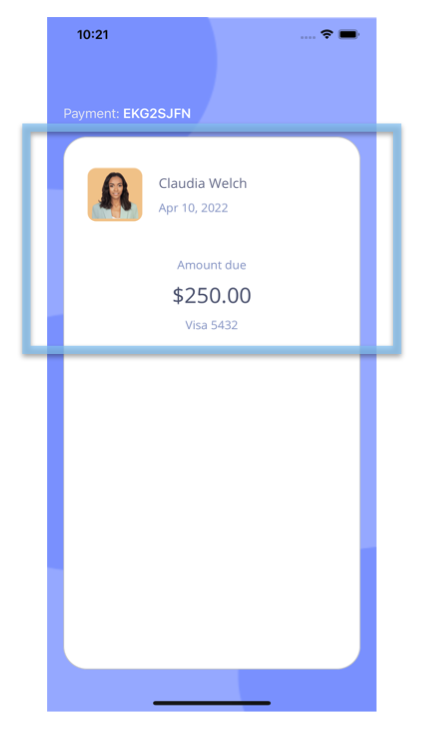
Let’s start with the “Main Frame” block, we will divide this explanation by each component that this block has for a better understanding:
 ➖ Background Image: Let’s start by adding the background image, the key point to achieve this is to indicate the image to cover all the Rows of the main Grid, and thus we cover the entire screen with the image, we do this with the Grid.RowSpan.
.
➖ Payment Label: This Label has a feature that I want to highlight, it’s a single text made up of different styles. For example, the word “Payment” has a more opaque color than the code that follows it and is not bold while the code is.
Probably the first solution that comes to your mind is to add two Labels… and yes… you can do it, but there is a faster and more efficient way to achieve it, for this we will use the FormattedText, let’s see how to do it:
➖Frame: This Frame will contain all the remaining information of this UI which is housed in the two remaining blocks, to achieve this we must have the Frame ready by integrating a layout (in this case a Grid) that allows you to organize these elements.

Let’s continue with the “Profile Information” block, this one is made up of the following elements:
➖Photo and main information:
The first one is an image with a transparent background on which we will round the edges and also give it a default background color. (💡 An example of this is the Uber app, which has the same background for driver photos!)
⚠ If you want to know more about Borders, I recommend the article Applying borders in .NET MAUI.
➖Amount & card information

 Finally, let’s start building the “Billing Plan” block, just like the previous blocks, I’ll explain each set of elements that this block contains:
➖ Frame & plans description: As you can see this information is contained within a block with gray borders, we achieve this with a Frame. We will also add the main titles for the plan description.
⚠To organize the information inside the Frame, we will use a VerticalStackLayout, if you want to know more information about the subject, I recommend the article “Horizontal & VerticalStackLayout in .NET MAUI”.
➖ Plan’s description: We need another Frame to add this information.
➖ General information:
 .
.

2 thoughts on “Replicating Billing Dashboard UI in .NET MAUI”