
As Developers, we all want our code to work, but if we just write code, chances are we end up with a complex code, and really hard to read, we all want our code to be clean, organized and easy to read, that’s where Design Patterns come into play. But exactly why do we use it? Design patterns offers us architecture patterns and a set of previously defined principles that our application must comply to align to the Design Pattern. In this case, I will explain how to use one of the most used design patterns in Xamarin Forms: The MVVM (Model-View-View-Model).
What do MVVM Pattern gives us?:✔ Cleaner and more organized code.
✔ Better code quality to achieve a correct understanding for other developers.
✔ Code reuse
✔ Easier application maintenance
Let’s start!!!
What is MVVM Pattern?
The Model-View-ViewModel (MVVM) pattern helps us separate the business logic and the user interface, this eases the test, maintenance and evolution of our code. There are three core components:

Creating a scenario example to apply the MVVM Pattern
Before we start, I will show you the methodology we will be using in this explanation. We will apply the MVVM Pattern, step by step, to a simple Phonebook application. Our applications only have a few requirements that we’ll break down each one into the component it belongs.
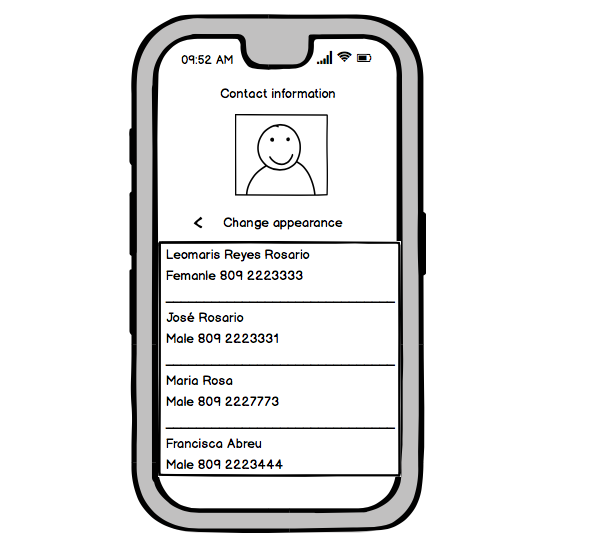
We have the following requirements:? The phonebook will have the following field: Name, last name, phone number and gender.
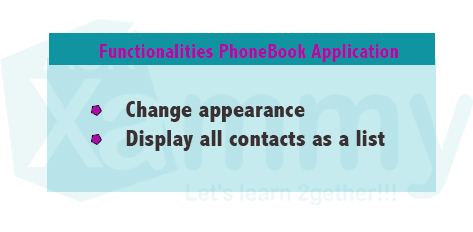
? Will display all contacts as a list.
?The application is going to have a main Button that changes the color appearance, making a click.
? The screen will look like this:
Knowing the MVVM components
Model
Models classes represent the application domain model, within which are contained: The data model and business logic. At time to start an application is the first component used, because here we define the attributes needed. In our example, to understand better, we will start to define the attributes that the Phonebook application needs. The first requirement defines these attributes.
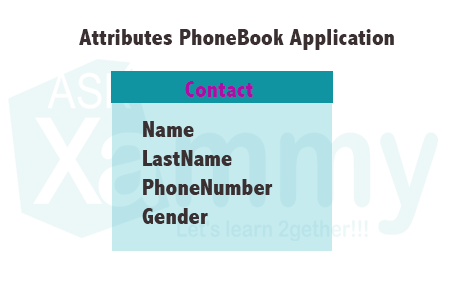
Now, let’s create a folder named: Models, inside there add the contact class with the attributes, as the following example:
ViewModel
The View model contains all the presentation logic. Implements properties and commands that define the functionalities that will be making our application. These definitions are able to bind with the View (Graphic components). Therefore, It’s in charge of communicating the models and the views.
Continuing our example, to understand better, we will be defining the functionalities that the Phonebook application needs. The second, third and fourth requirement defines these attributes.
Let’s code!
1. In the first block, I was implementing the INotifyPropertyChanged interface, which is responsible for notifies clients that a property value has changed You can read more information here.
2. Here we will be filling the Collection with some data test, to be able to display in our PhoneBook example.
3. To finish, let’s the “Change appearance” action
As we can see, in the ContactInformationViewModel class where adding the functionality needed. And you can include inside the ViewModel folder as many class as you need.
View
The View defines how the information and the functionalities will be displayed in a graphic way. Have the responsibility to define the structure that will get out screen. This can be defined with XAML or in a Code-Behind but is recommended used XAML.
To finish this example, we will be making the connection between Model and View-Model in the View. We just have to do the following steps:
1. Add the BindingContext source to fill the XAML. In this case with the ContactInformationViewModel class.
2. To call every attribute as you need, you just have to add the Binding word next to the attribute name, as the following example:
Bindings allow properties of two objects to be linked. And allows us to show all the information contained in the ViewModel. More information here.
3. In the example, I created the ChangeAppearanceCommand class to make a change in the UI Appearance, using Commands. It’s allows us to add every action that we want from the ViewModel, for example, some action to do when a Button is Clicked. More information here.
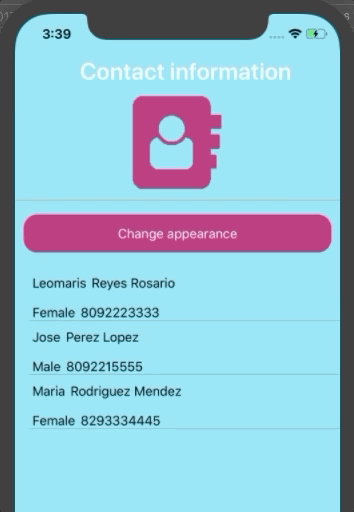
Here I just added the XAML (View), to conclude the PhoneBook application. In the Views folder we can add as many folder as we need.Done! Good luck with your implementation! ?
![]() Click to see an example in my GitHub.
Click to see an example in my GitHub.
Spanish post: https://medium.com/@reyes.leomaris/aplicando-el-patrón-de-diseño-mvvm-d4156e51bbe
References: https://docs.microsoft.com/en-us/xamarin/xamarin-forms/enterprise-application-patterns/mvvm


Hi Leomaris Reyes,
Thanks for the post on MVVM. It is very helpful.. 🙂
Can you also explain how to make a web service to connect to a Xamarin forms application.
I have a database in my office server and I want to learn how to access this db through my XF application.
Any advice will be helpful.
Thanks.
Thank you! You can read this article to start learning a web service development:
https://dominiotic.com/serie-desarrolla-tu-primer-api-rest-en-asp-net-core-prepara-tu-entorno/
And this to consume them from Xamarin: https://askxammy.com/using-refit-to-consume-restful-web-service-in-xamarin-forms/