

⚠ Before starting, to get the best out of the post, I’ll leave you some instructional notes so that you have a better experience reproducing the UI:
First of all, let’s add the NuGet Package needed!
- To achieve gradient block and rounded borders, add PancakeView! ?? (⚠ We will be using this NuGet in more than one block, you can identify them when you see them marked with the star. ⭐)

Them, add the following namespace in your XAML:
Let’s start!
Let’s divide the original design into blocks
For better understanding, I have divided the original design into blocks, which are listed in the order in which we will be reproducing them, these are:


Once we create the main structure, let’s go step by step, to build the first block. For each code block I have added some instructional lines so that you know where to add the code, which say: <! – Add here the “Block name” ->.
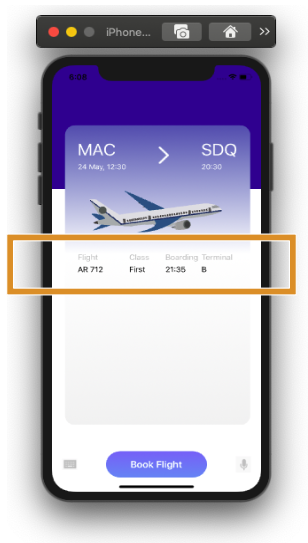
➖Blue background bar

 .
.
Now, let’s continue with one of the coolest blocks “Gradient background”! ?.
⭐ Since the goal of the Application is that different flights can be viewed in a gradient frame, in this block we’ll be using a CollectionView.
Do you remember the Flights Model created in the first part of these series? Great! Let’s start using in the CollectionView, thanks to the ItemsSource property we can easily Bind our data. (ItemsSource=”{Binding flight}”).
⚠ Important: For now we will add a fixed size to the Grid that is indicated in the code as <! — WidthRequest will be changed later- ->, this is so that you can see the design. (In the next block you can remove the WidthRequest property.)
Here the code implementation!

Now, let’s start to fill out the information from the flight and the passengers.
As the information contained in the complete flight block is a bit long, I have divided in “Flight information part (1 and 2,3 )” blocks.!
⚠ Important: Here you can already remove the temporary WidthRequest indicated in the previous block.
.


So, Let’s continue with the “Flight information (Part 2) block”.
.

 Remember the passenger information we filled out in the first part of this article? This is the time to show it! Thanks to this design we will be able to display the passenger information of each flight. In this block we will also be using a CollectionView.
⭐ We achieve the effect of rounded images by adding the CornerRadius with a value of 50% of that indicated in the HeightRequest property.

.
Finally, let’s add the Payment block!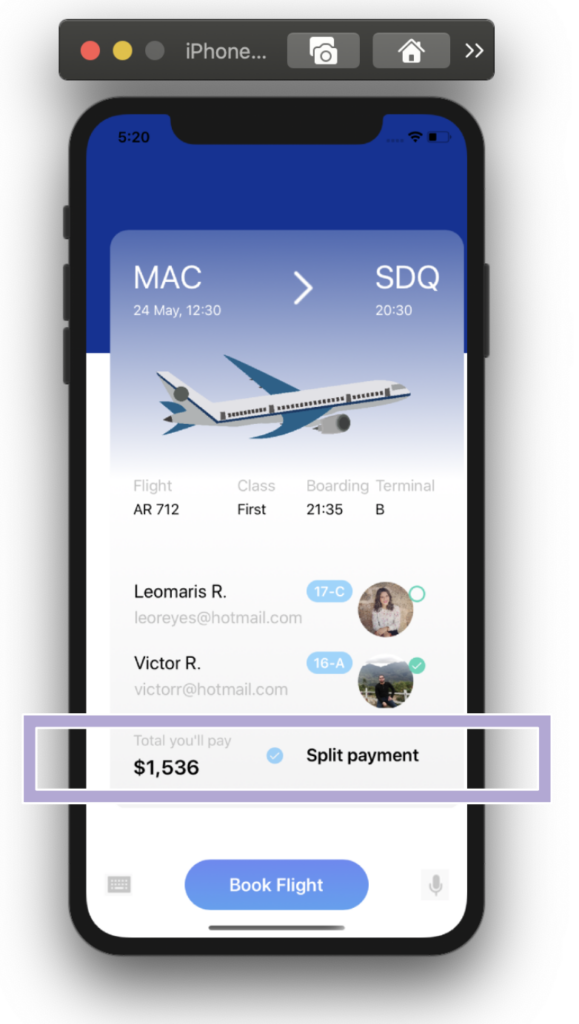
.
.
.
.
.


Great job Leomaris!
Saludos desde Argentina!
Gracias! ?
Leomaris podrías hacer un día un directo/grabado de hacer una app desde 0 a fin. Algo que tuviera un poco de todo, themming, código, etc… La gente busca mucho eso y no hay nada en google ni Youtube
Hola! El objetivo es ir detallando esos puntos importantes para hacer una App desde cero y que los temas no sean abrumadores, por eso los divido, pero si hay un punto específico que quisieras que trate pues dime y lo escribo!
hi can yu help me
. i want use this dynamic data
It depends on what you want to do exactly but for example, you can consume an API!
Here is a link that shows you how to do it: https://askxammy.com/using-refit-to-consume-restful-web-service-in-xamarin-forms/
Great! tutorial with detail explanation. Thank you very much!
Would you share, if there is a part three of this UI?
Hello!! 💕 I’m glad you liked it! We will not have a third part, the second is the last of this series! But keep an eye out for the other UIs!